Add New Customized Label Cloud in Blogger with CSS3
In my previous post, I shared with you how to Add Customize Blogger Cloud Label Widget, many i applied it and appreciated it. Maybe you are fed-up because of the default Labels Widget of Blogger Platform that does not have a clean and elegant look, which appears at the sidebar of your Blogger Blog. Sometimes, a dirty looking Label cloud could horribly dent the complete outlook of a website.
Consider a website that has a neat and stylish look but if the Label Clouds is unclean then, it could literally kill the complete viewpoint of a reader. Today, I want to share with you how to add new customized label cloud for blogger in your blog with CSS3, to give your blog elegant look.
==> Now within the Template use CTRL+F Shortcut to Search for ]]></b:skin> and just above it paste the following CSS Coding below.
Consider a website that has a neat and stylish look but if the Label Clouds is unclean then, it could literally kill the complete viewpoint of a reader. Today, I want to share with you how to add new customized label cloud for blogger in your blog with CSS3, to give your blog elegant look.
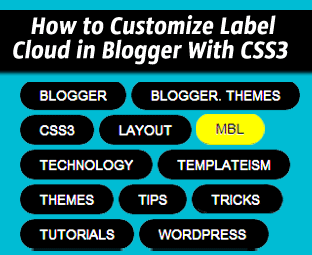
The Default Label Cloud Widget for Blogger Platform has a quite old look. Since, we are in the days of CSS3. Therefore, we have to apply latest techniques. Consider the Following screenshot to see the Label Clouds i.e. the Default one and the Customized one.
How To Customize Label Cloud with CSS3
The steps mentioned below are fairly straightforward and would hardly take few minutes to complete. Consider the following instructions as mentioned below.
==> Login to Blogger.com >> Click Layout >> Add a Gadget >> Label.
==> Select the Cloud from the Display settings.
==> Uncheck the Show number of post per label.
==> Now go ahead and Save the widget and that’s it we have successfully integrated a Label Cloud widget.
Customizing and Stylizing Blogger Label Cloud Widget:
==> Once again login to your Blogger Dashboard >> Click Template >> Select Edit HTML
==> Back up your blog using Download Full Template as a precaution in case you accidently overwrite some code and are not able to retrieve it.
/*--- MBL Custom Label Cloud With CSS3 --- */
.Label a{
padding-left:20px;
background:#000;
padding:0 20px;
color:#fff!important;
border-radius:100px;
-moz-border-radius:100px;
height:32px;
line-height:32px;
text-transform:uppercase;
text-decoration:none;
border:none !important;
-webkit-transition:all .3s ease-in-out !important;t: 30pxt: 30px;
float:left;
margin-left:5px;
margin-top:5px;
font-size:14px; }
.Label a:hover{
color:#000 !important;
background:#ff0; }
==> Change the Hover Color Replace #ff0; with any color according to the desire needs. Also, to increase/decrease the font size replace 14px according to your needs.
==> After the customizing, save the template. Go ahead and check out your website and am sure that you would love the modification that have made in the Label Cloud.
Feel free to leave your comments and suggestions.
If you liked this guide, please share it with your friends and family.


![How to Watch Live Satellite TV Channels On Your Mobile Phone [Android, Blackberry, iPhones, Symbian phones]](https://blogger.googleusercontent.com/img/b/R29vZ2xl/AVvXsEg47Rpe7m4fiJ0sQFrw_IUswFrmKT9QyvXh9zvmEQO4dWGhhe6qGleKlyKo4VZ_lvnyNSK_HcZMRhxQPHrYNw-UKaW9N9RUJpyjmtCptFb888_KeYVYk3cmynaVWBkdYGU7g9-QZIYF0uc/s72-c/live+tv+1.jpg)

![Download Internet Download Manager 6.18 | Resolve/Activate Fake Serial Registration Key Problem On Internet Download Manager [IDM]](https://blogger.googleusercontent.com/img/b/R29vZ2xl/AVvXsEgiQBDM0z6uFxiG2KmSlwhx20jJ9_kklV0kl03tn_oOJM_WqfE-9n3GGsy9UVrGMqWG4c5Q1hE22hLMh1pj2rffcxHYTgIWDq5-nBVGtmKKDNzAzAMyOrqAq1wfYhlvJI1l4_rZUT5CUOM/s72-c/IDM.jpg)


![How to Watch Live Satellite TV Channels On Your Mobile Phone [Android, Blackberry, iPhones, Symbian phones]](https://blogger.googleusercontent.com/img/b/R29vZ2xl/AVvXsEg47Rpe7m4fiJ0sQFrw_IUswFrmKT9QyvXh9zvmEQO4dWGhhe6qGleKlyKo4VZ_lvnyNSK_HcZMRhxQPHrYNw-UKaW9N9RUJpyjmtCptFb888_KeYVYk3cmynaVWBkdYGU7g9-QZIYF0uc/w72-h72-p-k-no-nu/live+tv+1.jpg)

![Download Internet Download Manager 6.18 | Resolve/Activate Fake Serial Registration Key Problem On Internet Download Manager [IDM]](https://blogger.googleusercontent.com/img/b/R29vZ2xl/AVvXsEgiQBDM0z6uFxiG2KmSlwhx20jJ9_kklV0kl03tn_oOJM_WqfE-9n3GGsy9UVrGMqWG4c5Q1hE22hLMh1pj2rffcxHYTgIWDq5-nBVGtmKKDNzAzAMyOrqAq1wfYhlvJI1l4_rZUT5CUOM/w72-h72-p-k-no-nu/IDM.jpg)


Post a Comment